Showing posts with label Handmade Nailart. Show all posts

Monday, February 14, 2011

Notd : Piet Mondriaan Inspired

Gister konden jullie al lezen dat ik een nailart gemaakt heb die geïnspireerd is op een schilder, door de comments van gister kreeg ik meteen meer ideeën om vaker zoiets te doen! Je kunt het inderdaad in de titel al lezen, deze nailart is geïnspireerd op een schilderij van Piet Mondriaan, een Nederlandse schilder geboren in de 19e eeuw.


Yesterday I told you that I made a nailart inspired on a painter, through the comments I've got some nice new ideas, I'm thinking of doing this again, but then with a painting from another painter, sounds like a nice idea! So the title says it all, this nailart is inspired on Piet Mondriaan, this is a dutch painter which is born in the 19th century.


 *Painting Mondriaan, cubism*

Hier kun je mijn nailart zien, zoals je kunt zien heb ik me een beetje gehouden aan de kleuren die mondriaan gebruikte: Geel, Rood, Blauw en zwart. De vakjes heb ik zelf een beetje op gevoel gemaakt en ook de kleurtjes heb ik op gevoel ingekleurd. Ah goed je snapt het idee!

Here you can see my nailart, as you can see I used the idea of cubism and the colours Mondriaan used: Yellow, Red, Blue and Black. I made the boxes on feeling and the colours too. Ah well you get my idea!

Als ik naar deze foto kijk, krijg ik meteen zo'n kleurrijk gevoel! En dat met het minimale gebruik van kleurtjes! Voor de witte ondergrond heb ik La Femme Beauty - White gebruikt, mijn favo witte lakje op dit moment (haha ik heb 2 backups, en één potje welke bijna leeg is!). De zwarte lijntjes en de zwarte vakjes zijn gemaakt met Max - Black en een klein kwastje. Het blauwe lakje is La femme Beauty - Blue Cream (Jaa dat kleine kwastje is handig hiervoor!) De rode en gele kleur zijn gemaakt met een striper.

When I look at this picture, I get such a colourful feeling! And that with using minimum of colours! For the white base I used La Femme Beauty - White (My favorite white at this moment (haha i've got 2 backups and one half empty bottle of this one). The black lines and boxes are made with Max - Black and a little brush. The blue boxes are made with La Femme Beauty - Blue Cream (Yes i found something to do with this polish!) The red and yellow are both stripers.

Wat vinden jullie van deze nailart? En zouden jullie het leuk vinden om vaker een nailart te zien welke geïnspireerd is op een schilderij?/ What do you think about this nailart? And do you like the idea of making another nailart based on paintings?

Notd : Piet Mondriaan Inspired

Gister konden jullie al lezen dat ik een nailart gemaakt heb die geïnspireerd is op een schilder, door de comments van gister kreeg ik meteen meer ideeën om vaker zoiets te doen! Je kunt het inderdaad in de titel al lezen, deze nailart is geïnspireerd op een schilderij van Piet Mondriaan, een Nederlandse schilder geboren in de 19e eeuw.


Yesterday I told you that I made a nailart inspired on a painter, through the comments I've got some nice new ideas, I'm thinking of doing this again, but then with a painting from another painter, sounds like a nice idea! So the title says it all, this nailart is inspired on Piet Mondriaan, this is a dutch painter which is born in the 19th century.


 *Painting Mondriaan, cubism*

Hier kun je mijn nailart zien, zoals je kunt zien heb ik me een beetje gehouden aan de kleuren die mondriaan gebruikte: Geel, Rood, Blauw en zwart. De vakjes heb ik zelf een beetje op gevoel gemaakt en ook de kleurtjes heb ik op gevoel ingekleurd. Ah goed je snapt het idee!

Here you can see my nailart, as you can see I used the idea of cubism and the colours Mondriaan used: Yellow, Red, Blue and Black. I made the boxes on feeling and the colours too. Ah well you get my idea!

Als ik naar deze foto kijk, krijg ik meteen zo'n kleurrijk gevoel! En dat met het minimale gebruik van kleurtjes! Voor de witte ondergrond heb ik La Femme Beauty - White gebruikt, mijn favo witte lakje op dit moment (haha ik heb 2 backups, en één potje welke bijna leeg is!). De zwarte lijntjes en de zwarte vakjes zijn gemaakt met Max - Black en een klein kwastje. Het blauwe lakje is La femme Beauty - Blue Cream (Jaa dat kleine kwastje is handig hiervoor!) De rode en gele kleur zijn gemaakt met een striper.

When I look at this picture, I get such a colourful feeling! And that with using minimum of colours! For the white base I used La Femme Beauty - White (My favorite white at this moment (haha i've got 2 backups and one half empty bottle of this one). The black lines and boxes are made with Max - Black and a little brush. The blue boxes are made with La Femme Beauty - Blue Cream (Yes i found something to do with this polish!) The red and yellow are both stripers.

Wat vinden jullie van deze nailart? En zouden jullie het leuk vinden om vaker een nailart te zien welke geïnspireerd is op een schilderij?/ What do you think about this nailart? And do you like the idea of making another nailart based on paintings?

Tuesday, February 8, 2011

Notd : Piet Mondriaan Inspired

Gister konden jullie al lezen dat ik een nailart gemaakt heb die geïnspireerd is op een schilder, door de comments van gister kreeg ik meteen meer ideeën om vaker zoiets te doen! Je kunt het inderdaad in de titel al lezen, deze nailart is geïnspireerd op een schilderij van Piet Mondriaan, een Nederlandse schilder geboren in de 19e eeuw.


Yesterday I told you that I made a nailart inspired on a painter, through the comments I've got some nice new ideas, I'm thinking of doing this again, but then with a painting from another painter, sounds like a nice idea! So the title says it all, this nailart is inspired on Piet Mondriaan, this is a dutch painter which is born in the 19th century.


 *Painting Mondriaan, cubism*

Hier kun je mijn nailart zien, zoals je kunt zien heb ik me een beetje gehouden aan de kleuren die mondriaan gebruikte: Geel, Rood, Blauw en zwart. De vakjes heb ik zelf een beetje op gevoel gemaakt en ook de kleurtjes heb ik op gevoel ingekleurd. Ah goed je snapt het idee!

Here you can see my nailart, as you can see I used the idea of cubism and the colours Mondriaan used: Yellow, Red, Blue and Black. I made the boxes on feeling and the colours too. Ah well you get my idea!

Als ik naar deze foto kijk, krijg ik meteen zo'n kleurrijk gevoel! En dat met het minimale gebruik van kleurtjes! Voor de witte ondergrond heb ik La Femme Beauty - White gebruikt, mijn favo witte lakje op dit moment (haha ik heb 2 backups, en één potje welke bijna leeg is!). De zwarte lijntjes en de zwarte vakjes zijn gemaakt met Max - Black en een klein kwastje. Het blauwe lakje is La femme Beauty - Blue Cream (Jaa dat kleine kwastje is handig hiervoor!) De rode en gele kleur zijn gemaakt met een striper.

When I look at this picture, I get such a colourful feeling! And that with using minimum of colours! For the white base I used La Femme Beauty - White (My favorite white at this moment (haha i've got 2 backups and one half empty bottle of this one). The black lines and boxes are made with Max - Black and a little brush. The blue boxes are made with La Femme Beauty - Blue Cream (Yes i found something to do with this polish!) The red and yellow are both stripers.

Wat vinden jullie van deze nailart? En zouden jullie het leuk vinden om vaker een nailart te zien welke geïnspireerd is op een schilderij?/ What do you think about this nailart? And do you like the idea of making another nailart based on paintings?

Notd : Piet Mondriaan Inspired

Gister konden jullie al lezen dat ik een nailart gemaakt heb die geïnspireerd is op een schilder, door de comments van gister kreeg ik meteen meer ideeën om vaker zoiets te doen! Je kunt het inderdaad in de titel al lezen, deze nailart is geïnspireerd op een schilderij van Piet Mondriaan, een Nederlandse schilder geboren in de 19e eeuw.


Yesterday I told you that I made a nailart inspired on a painter, through the comments I've got some nice new ideas, I'm thinking of doing this again, but then with a painting from another painter, sounds like a nice idea! So the title says it all, this nailart is inspired on Piet Mondriaan, this is a dutch painter which is born in the 19th century.


 *Painting Mondriaan, cubism*

Hier kun je mijn nailart zien, zoals je kunt zien heb ik me een beetje gehouden aan de kleuren die mondriaan gebruikte: Geel, Rood, Blauw en zwart. De vakjes heb ik zelf een beetje op gevoel gemaakt en ook de kleurtjes heb ik op gevoel ingekleurd. Ah goed je snapt het idee!

Here you can see my nailart, as you can see I used the idea of cubism and the colours Mondriaan used: Yellow, Red, Blue and Black. I made the boxes on feeling and the colours too. Ah well you get my idea!

Als ik naar deze foto kijk, krijg ik meteen zo'n kleurrijk gevoel! En dat met het minimale gebruik van kleurtjes! Voor de witte ondergrond heb ik La Femme Beauty - White gebruikt, mijn favo witte lakje op dit moment (haha ik heb 2 backups, en één potje welke bijna leeg is!). De zwarte lijntjes en de zwarte vakjes zijn gemaakt met Max - Black en een klein kwastje. Het blauwe lakje is La femme Beauty - Blue Cream (Jaa dat kleine kwastje is handig hiervoor!) De rode en gele kleur zijn gemaakt met een striper.

When I look at this picture, I get such a colourful feeling! And that with using minimum of colours! For the white base I used La Femme Beauty - White (My favorite white at this moment (haha i've got 2 backups and one half empty bottle of this one). The black lines and boxes are made with Max - Black and a little brush. The blue boxes are made with La Femme Beauty - Blue Cream (Yes i found something to do with this polish!) The red and yellow are both stripers.

Wat vinden jullie van deze nailart? En zouden jullie het leuk vinden om vaker een nailart te zien welke geïnspireerd is op een schilderij?/ What do you think about this nailart? And do you like the idea of making another nailart based on paintings?

Notd : Piet Mondriaan Inspired

Gister konden jullie al lezen dat ik een nailart gemaakt heb die geïnspireerd is op een schilder, door de comments van gister kreeg ik meteen meer ideeën om vaker zoiets te doen! Je kunt het inderdaad in de titel al lezen, deze nailart is geïnspireerd op een schilderij van Piet Mondriaan, een Nederlandse schilder geboren in de 19e eeuw.


Yesterday I told you that I made a nailart inspired on a painter, through the comments I've got some nice new ideas, I'm thinking of doing this again, but then with a painting from another painter, sounds like a nice idea! So the title says it all, this nailart is inspired on Piet Mondriaan, this is a dutch painter which is born in the 19th century.


 *Painting Mondriaan, cubism*

Hier kun je mijn nailart zien, zoals je kunt zien heb ik me een beetje gehouden aan de kleuren die mondriaan gebruikte: Geel, Rood, Blauw en zwart. De vakjes heb ik zelf een beetje op gevoel gemaakt en ook de kleurtjes heb ik op gevoel ingekleurd. Ah goed je snapt het idee!

Here you can see my nailart, as you can see I used the idea of cubism and the colours Mondriaan used: Yellow, Red, Blue and Black. I made the boxes on feeling and the colours too. Ah well you get my idea!

Als ik naar deze foto kijk, krijg ik meteen zo'n kleurrijk gevoel! En dat met het minimale gebruik van kleurtjes! Voor de witte ondergrond heb ik La Femme Beauty - White gebruikt, mijn favo witte lakje op dit moment (haha ik heb 2 backups, en één potje welke bijna leeg is!). De zwarte lijntjes en de zwarte vakjes zijn gemaakt met Max - Black en een klein kwastje. Het blauwe lakje is La femme Beauty - Blue Cream (Jaa dat kleine kwastje is handig hiervoor!) De rode en gele kleur zijn gemaakt met een striper.

When I look at this picture, I get such a colourful feeling! And that with using minimum of colours! For the white base I used La Femme Beauty - White (My favorite white at this moment (haha i've got 2 backups and one half empty bottle of this one). The black lines and boxes are made with Max - Black and a little brush. The blue boxes are made with La Femme Beauty - Blue Cream (Yes i found something to do with this polish!) The red and yellow are both stripers.

Wat vinden jullie van deze nailart? En zouden jullie het leuk vinden om vaker een nailart te zien welke geïnspireerd is op een schilderij?/ What do you think about this nailart? And do you like the idea of making another nailart based on paintings?

Tuesday, January 25, 2011

Notd: Bunny's!

Vandaag weer een nieuwe Notd! Kijk mee :)

Today another Notd, scroll down for more :)


Dit is de Notd van deze keer. Een schattige french manicure met op de ringvinger een konijnenhoofdje. Het ontwerp van een konijntje heb ik ooit ergens op internet gezien bij iemand die al haar nagels met konijntjes gedaan had. Ik vond alle nagels iets té veel van het goede dus heb het gelaten bij 1 konijnenhoofdje en de rest van de nagels een simpele rustige french.

This is the Notd for this time. A cute french manicure with a little rabbit on my ringfingers. I saw the designs of the rabbits on somebody's nails (don't know from who) but she did on all her nails a rabbit. I thought it would be a little messy with so many rabbits, so I just made one, and the other nails a simple french manicure.

Ik was niet zo heel tevreden met de oogjes op de eerste foto, dus later heb ik besloten nog een zwart stipje in de oogjes te maken, zo ziet het konijntje er iets minder 'blind' uit. Voor de witte french manicure heb ik La Femme Beauty - White gebruikt, voor de zwarte lijntjes daarboven: Max - Black. En deze zelfde 2 lakjes heb ik ook gebruikt voor het konijntje, samen met La Femme Beauty - Pink Cream voor de oortjes en neusje, en La Femme Beauty - Ultra Blue voor de oogjes.

I wasn't very happy with the way the eyes looked, made me think of a blind bunny.. So I added some black dots in the eyes. For the white french Manicure I used : La Femme Beauty - White and for the black stripes above the french I used Max - Black. I used these 2 polishes also for the bunny along with La Femme Beauty - Pink Cream for the ears/nose and La Femme Beauty - Ultra Blue for the eyes.

Thanks for stopping by! Check out the giveaway in my sidebar!

Notd: Bunny's!

Vandaag weer een nieuwe Notd! Kijk mee :)

Today another Notd, scroll down for more :)


Dit is de Notd van deze keer. Een schattige french manicure met op de ringvinger een konijnenhoofdje. Het ontwerp van een konijntje heb ik ooit ergens op internet gezien bij iemand die al haar nagels met konijntjes gedaan had. Ik vond alle nagels iets té veel van het goede dus heb het gelaten bij 1 konijnenhoofdje en de rest van de nagels een simpele rustige french.

This is the Notd for this time. A cute french manicure with a little rabbit on my ringfingers. I saw the designs of the rabbits on somebody's nails (don't know from who) but she did on all her nails a rabbit. I thought it would be a little messy with so many rabbits, so I just made one, and the other nails a simple french manicure.

Ik was niet zo heel tevreden met de oogjes op de eerste foto, dus later heb ik besloten nog een zwart stipje in de oogjes te maken, zo ziet het konijntje er iets minder 'blind' uit. Voor de witte french manicure heb ik La Femme Beauty - White gebruikt, voor de zwarte lijntjes daarboven: Max - Black. En deze zelfde 2 lakjes heb ik ook gebruikt voor het konijntje, samen met La Femme Beauty - Pink Cream voor de oortjes en neusje, en La Femme Beauty - Ultra Blue voor de oogjes.

I wasn't very happy with the way the eyes looked, made me think of a blind bunny.. So I added some black dots in the eyes. For the white french Manicure I used : La Femme Beauty - White and for the black stripes above the french I used Max - Black. I used these 2 polishes also for the bunny along with La Femme Beauty - Pink Cream for the ears/nose and La Femme Beauty - Ultra Blue for the eyes.

Thanks for stopping by! Check out the giveaway in my sidebar!

Notd: Bunny's!

Vandaag weer een nieuwe Notd! Kijk mee :)

Today another Notd, scroll down for more :)


Dit is de Notd van deze keer. Een schattige french manicure met op de ringvinger een konijnenhoofdje. Het ontwerp van een konijntje heb ik ooit ergens op internet gezien bij iemand die al haar nagels met konijntjes gedaan had. Ik vond alle nagels iets té veel van het goede dus heb het gelaten bij 1 konijnenhoofdje en de rest van de nagels een simpele rustige french.

This is the Notd for this time. A cute french manicure with a little rabbit on my ringfingers. I saw the designs of the rabbits on somebody's nails (don't know from who) but she did on all her nails a rabbit. I thought it would be a little messy with so many rabbits, so I just made one, and the other nails a simple french manicure.

Ik was niet zo heel tevreden met de oogjes op de eerste foto, dus later heb ik besloten nog een zwart stipje in de oogjes te maken, zo ziet het konijntje er iets minder 'blind' uit. Voor de witte french manicure heb ik La Femme Beauty - White gebruikt, voor de zwarte lijntjes daarboven: Max - Black. En deze zelfde 2 lakjes heb ik ook gebruikt voor het konijntje, samen met La Femme Beauty - Pink Cream voor de oortjes en neusje, en La Femme Beauty - Ultra Blue voor de oogjes.

I wasn't very happy with the way the eyes looked, made me think of a blind bunny.. So I added some black dots in the eyes. For the white french Manicure I used : La Femme Beauty - White and for the black stripes above the french I used Max - Black. I used these 2 polishes also for the bunny along with La Femme Beauty - Pink Cream for the ears/nose and La Femme Beauty - Ultra Blue for the eyes.

Thanks for stopping by! Check out the giveaway in my sidebar!

Notd: Bunny's!

Vandaag weer een nieuwe Notd! Kijk mee :)

Today another Notd, scroll down for more :)


Dit is de Notd van deze keer. Een schattige french manicure met op de ringvinger een konijnenhoofdje. Het ontwerp van een konijntje heb ik ooit ergens op internet gezien bij iemand die al haar nagels met konijntjes gedaan had. Ik vond alle nagels iets té veel van het goede dus heb het gelaten bij 1 konijnenhoofdje en de rest van de nagels een simpele rustige french.

This is the Notd for this time. A cute french manicure with a little rabbit on my ringfingers. I saw the designs of the rabbits on somebody's nails (don't know from who) but she did on all her nails a rabbit. I thought it would be a little messy with so many rabbits, so I just made one, and the other nails a simple french manicure.

Ik was niet zo heel tevreden met de oogjes op de eerste foto, dus later heb ik besloten nog een zwart stipje in de oogjes te maken, zo ziet het konijntje er iets minder 'blind' uit. Voor de witte french manicure heb ik La Femme Beauty - White gebruikt, voor de zwarte lijntjes daarboven: Max - Black. En deze zelfde 2 lakjes heb ik ook gebruikt voor het konijntje, samen met La Femme Beauty - Pink Cream voor de oortjes en neusje, en La Femme Beauty - Ultra Blue voor de oogjes.

I wasn't very happy with the way the eyes looked, made me think of a blind bunny.. So I added some black dots in the eyes. For the white french Manicure I used : La Femme Beauty - White and for the black stripes above the french I used Max - Black. I used these 2 polishes also for the bunny along with La Femme Beauty - Pink Cream for the ears/nose and La Femme Beauty - Ultra Blue for the eyes.

Thanks for stopping by! Check out the giveaway in my sidebar!

Notd: Bunny's!

Vandaag weer een nieuwe Notd! Kijk mee :)

Today another Notd, scroll down for more :)


Dit is de Notd van deze keer. Een schattige french manicure met op de ringvinger een konijnenhoofdje. Het ontwerp van een konijntje heb ik ooit ergens op internet gezien bij iemand die al haar nagels met konijntjes gedaan had. Ik vond alle nagels iets té veel van het goede dus heb het gelaten bij 1 konijnenhoofdje en de rest van de nagels een simpele rustige french.

This is the Notd for this time. A cute french manicure with a little rabbit on my ringfingers. I saw the designs of the rabbits on somebody's nails (don't know from who) but she did on all her nails a rabbit. I thought it would be a little messy with so many rabbits, so I just made one, and the other nails a simple french manicure.

Ik was niet zo heel tevreden met de oogjes op de eerste foto, dus later heb ik besloten nog een zwart stipje in de oogjes te maken, zo ziet het konijntje er iets minder 'blind' uit. Voor de witte french manicure heb ik La Femme Beauty - White gebruikt, voor de zwarte lijntjes daarboven: Max - Black. En deze zelfde 2 lakjes heb ik ook gebruikt voor het konijntje, samen met La Femme Beauty - Pink Cream voor de oortjes en neusje, en La Femme Beauty - Ultra Blue voor de oogjes.

I wasn't very happy with the way the eyes looked, made me think of a blind bunny.. So I added some black dots in the eyes. For the white french Manicure I used : La Femme Beauty - White and for the black stripes above the french I used Max - Black. I used these 2 polishes also for the bunny along with La Femme Beauty - Pink Cream for the ears/nose and La Femme Beauty - Ultra Blue for the eyes.

Thanks for stopping by! Check out the giveaway in my sidebar!

Saturday, January 22, 2011

Nailart on Popsticks #6

Vandaag weer een nieuwe Nailart on Popsticks. Vandaag een superschattig 'wegvliegend vlindertje'. Kijk mee!

Today another part of Nailart on Popsticks. This time it's a supercute design from a 'flying butterfly'! Look further :)!


Dit is het design, een schattig vlindertje. Met de hand gemaakt, dus natuurlijk een tikkie origineler dan een gestempelde vlinder van Konad. Ik ben hier begonnen met een lichte blauwe ondergrond. Op de tip heb ik een iets fellere licht blauw gepakt en hiermee de 'lucht' gesponst. (Op de foto's lijkt de lucht net wit, maar in real life valt het gesponste deel ook minder op).

Daarna begin je met de outlines van de vlinder. Dit is een beetje moeilijk uit te leggen zo, maar je begint bij het lichaampje, en vervolgens maak je de vleugeltjes, en de twee voelsprieten. Daarna kun je het vlindertje inkleuren met iedere kleur welke jij maar wilt gebruiken, ik heb hier gekozen voor rood, en het afgewerkt met een paar dunne zwarte lijntjes als versiersel op het vlindertje. Als laatste heb ik een paar zwarte stipjes als 'spoor' van het vlindertje gemaakt.

Natuurlijk kun je dit design ook wat opleuken met eventueel wat stempels van bloemen, of dezelfde vlindertjes in een kleiner formaat, er valt genoeg leuks te doen met dit idee!

This is the design, a cute little butterfly. Handmade, so it's a bit original then the butterflies from the Konad plates. So I started here with the blue background, I used a bit of a light blue. On the tip I sponged heaven with a brighter blue. This is gonna be the background of the nailart.

Up next you start with the outlining of the butterfly, it's hard to explain, but start with the body-> Wings, and end with the antenna of the butterfly. Now you can give the wings a colour, I gave it a red colour with some small black lines. I ended with a track of black dots.

This design is very easy to make, and ofcourse you can play with it. You can stamp or draw some flowers on it. Or you can make another smaller butterfly next to it etc. So just play with it!

P.S. Momenteel ben ik bezig met een stashfilmpje, helaas heb ik geen goed editprogramma om loze stukken uit het filmpje te knippen (met windows live movie maker kun je enkel het begin/eind knippen). Heeft iemand de gouden tip qua bewerkingsprogramma? (Ik werk met windows 7). Wanneer de filmpjes beter gaan worden zal ik van een aantal popsticks een videotutorial maken! Thanks!

P.S. I'm busy with my stashvideo, but I don't have a good program to cut in the video (I made some mistakes, woeps!). Now i'm using windows live movie maker, but with this programm you can't cut your videos. So does anyone have the golden tip for a programm to use? (I work with windows 7). When I got the right programm to edit, i'm going to make some videos with popstick designs, a videotutorial. Thanks!
 

Nailart on Popsticks #6

Vandaag weer een nieuwe Nailart on Popsticks. Vandaag een superschattig 'wegvliegend vlindertje'. Kijk mee!

Today another part of Nailart on Popsticks. This time it's a supercute design from a 'flying butterfly'! Look further :)!


Dit is het design, een schattig vlindertje. Met de hand gemaakt, dus natuurlijk een tikkie origineler dan een gestempelde vlinder van Konad. Ik ben hier begonnen met een lichte blauwe ondergrond. Op de tip heb ik een iets fellere licht blauw gepakt en hiermee de 'lucht' gesponst. (Op de foto's lijkt de lucht net wit, maar in real life valt het gesponste deel ook minder op).

Daarna begin je met de outlines van de vlinder. Dit is een beetje moeilijk uit te leggen zo, maar je begint bij het lichaampje, en vervolgens maak je de vleugeltjes, en de twee voelsprieten. Daarna kun je het vlindertje inkleuren met iedere kleur welke jij maar wilt gebruiken, ik heb hier gekozen voor rood, en het afgewerkt met een paar dunne zwarte lijntjes als versiersel op het vlindertje. Als laatste heb ik een paar zwarte stipjes als 'spoor' van het vlindertje gemaakt.

Natuurlijk kun je dit design ook wat opleuken met eventueel wat stempels van bloemen, of dezelfde vlindertjes in een kleiner formaat, er valt genoeg leuks te doen met dit idee!

This is the design, a cute little butterfly. Handmade, so it's a bit original then the butterflies from the Konad plates. So I started here with the blue background, I used a bit of a light blue. On the tip I sponged heaven with a brighter blue. This is gonna be the background of the nailart.

Up next you start with the outlining of the butterfly, it's hard to explain, but start with the body-> Wings, and end with the antenna of the butterfly. Now you can give the wings a colour, I gave it a red colour with some small black lines. I ended with a track of black dots.

This design is very easy to make, and ofcourse you can play with it. You can stamp or draw some flowers on it. Or you can make another smaller butterfly next to it etc. So just play with it!

P.S. Momenteel ben ik bezig met een stashfilmpje, helaas heb ik geen goed editprogramma om loze stukken uit het filmpje te knippen (met windows live movie maker kun je enkel het begin/eind knippen). Heeft iemand de gouden tip qua bewerkingsprogramma? (Ik werk met windows 7). Wanneer de filmpjes beter gaan worden zal ik van een aantal popsticks een videotutorial maken! Thanks!

P.S. I'm busy with my stashvideo, but I don't have a good program to cut in the video (I made some mistakes, woeps!). Now i'm using windows live movie maker, but with this programm you can't cut your videos. So does anyone have the golden tip for a programm to use? (I work with windows 7). When I got the right programm to edit, i'm going to make some videos with popstick designs, a videotutorial. Thanks!
 

Nailart on Popsticks #6

Vandaag weer een nieuwe Nailart on Popsticks. Vandaag een superschattig 'wegvliegend vlindertje'. Kijk mee!

Today another part of Nailart on Popsticks. This time it's a supercute design from a 'flying butterfly'! Look further :)!


Dit is het design, een schattig vlindertje. Met de hand gemaakt, dus natuurlijk een tikkie origineler dan een gestempelde vlinder van Konad. Ik ben hier begonnen met een lichte blauwe ondergrond. Op de tip heb ik een iets fellere licht blauw gepakt en hiermee de 'lucht' gesponst. (Op de foto's lijkt de lucht net wit, maar in real life valt het gesponste deel ook minder op).

Daarna begin je met de outlines van de vlinder. Dit is een beetje moeilijk uit te leggen zo, maar je begint bij het lichaampje, en vervolgens maak je de vleugeltjes, en de twee voelsprieten. Daarna kun je het vlindertje inkleuren met iedere kleur welke jij maar wilt gebruiken, ik heb hier gekozen voor rood, en het afgewerkt met een paar dunne zwarte lijntjes als versiersel op het vlindertje. Als laatste heb ik een paar zwarte stipjes als 'spoor' van het vlindertje gemaakt.

Natuurlijk kun je dit design ook wat opleuken met eventueel wat stempels van bloemen, of dezelfde vlindertjes in een kleiner formaat, er valt genoeg leuks te doen met dit idee!

This is the design, a cute little butterfly. Handmade, so it's a bit original then the butterflies from the Konad plates. So I started here with the blue background, I used a bit of a light blue. On the tip I sponged heaven with a brighter blue. This is gonna be the background of the nailart.

Up next you start with the outlining of the butterfly, it's hard to explain, but start with the body-> Wings, and end with the antenna of the butterfly. Now you can give the wings a colour, I gave it a red colour with some small black lines. I ended with a track of black dots.

This design is very easy to make, and ofcourse you can play with it. You can stamp or draw some flowers on it. Or you can make another smaller butterfly next to it etc. So just play with it!

P.S. Momenteel ben ik bezig met een stashfilmpje, helaas heb ik geen goed editprogramma om loze stukken uit het filmpje te knippen (met windows live movie maker kun je enkel het begin/eind knippen). Heeft iemand de gouden tip qua bewerkingsprogramma? (Ik werk met windows 7). Wanneer de filmpjes beter gaan worden zal ik van een aantal popsticks een videotutorial maken! Thanks!

P.S. I'm busy with my stashvideo, but I don't have a good program to cut in the video (I made some mistakes, woeps!). Now i'm using windows live movie maker, but with this programm you can't cut your videos. So does anyone have the golden tip for a programm to use? (I work with windows 7). When I got the right programm to edit, i'm going to make some videos with popstick designs, a videotutorial. Thanks!
 

Nailart on Popsticks #6

Vandaag weer een nieuwe Nailart on Popsticks. Vandaag een superschattig 'wegvliegend vlindertje'. Kijk mee!

Today another part of Nailart on Popsticks. This time it's a supercute design from a 'flying butterfly'! Look further :)!


Dit is het design, een schattig vlindertje. Met de hand gemaakt, dus natuurlijk een tikkie origineler dan een gestempelde vlinder van Konad. Ik ben hier begonnen met een lichte blauwe ondergrond. Op de tip heb ik een iets fellere licht blauw gepakt en hiermee de 'lucht' gesponst. (Op de foto's lijkt de lucht net wit, maar in real life valt het gesponste deel ook minder op).

Daarna begin je met de outlines van de vlinder. Dit is een beetje moeilijk uit te leggen zo, maar je begint bij het lichaampje, en vervolgens maak je de vleugeltjes, en de twee voelsprieten. Daarna kun je het vlindertje inkleuren met iedere kleur welke jij maar wilt gebruiken, ik heb hier gekozen voor rood, en het afgewerkt met een paar dunne zwarte lijntjes als versiersel op het vlindertje. Als laatste heb ik een paar zwarte stipjes als 'spoor' van het vlindertje gemaakt.

Natuurlijk kun je dit design ook wat opleuken met eventueel wat stempels van bloemen, of dezelfde vlindertjes in een kleiner formaat, er valt genoeg leuks te doen met dit idee!

This is the design, a cute little butterfly. Handmade, so it's a bit original then the butterflies from the Konad plates. So I started here with the blue background, I used a bit of a light blue. On the tip I sponged heaven with a brighter blue. This is gonna be the background of the nailart.

Up next you start with the outlining of the butterfly, it's hard to explain, but start with the body-> Wings, and end with the antenna of the butterfly. Now you can give the wings a colour, I gave it a red colour with some small black lines. I ended with a track of black dots.

This design is very easy to make, and ofcourse you can play with it. You can stamp or draw some flowers on it. Or you can make another smaller butterfly next to it etc. So just play with it!

P.S. Momenteel ben ik bezig met een stashfilmpje, helaas heb ik geen goed editprogramma om loze stukken uit het filmpje te knippen (met windows live movie maker kun je enkel het begin/eind knippen). Heeft iemand de gouden tip qua bewerkingsprogramma? (Ik werk met windows 7). Wanneer de filmpjes beter gaan worden zal ik van een aantal popsticks een videotutorial maken! Thanks!

P.S. I'm busy with my stashvideo, but I don't have a good program to cut in the video (I made some mistakes, woeps!). Now i'm using windows live movie maker, but with this programm you can't cut your videos. So does anyone have the golden tip for a programm to use? (I work with windows 7). When I got the right programm to edit, i'm going to make some videos with popstick designs, a videotutorial. Thanks!
 

Nailart on Popsticks #6

Vandaag weer een nieuwe Nailart on Popsticks. Vandaag een superschattig 'wegvliegend vlindertje'. Kijk mee!

Today another part of Nailart on Popsticks. This time it's a supercute design from a 'flying butterfly'! Look further :)!


Dit is het design, een schattig vlindertje. Met de hand gemaakt, dus natuurlijk een tikkie origineler dan een gestempelde vlinder van Konad. Ik ben hier begonnen met een lichte blauwe ondergrond. Op de tip heb ik een iets fellere licht blauw gepakt en hiermee de 'lucht' gesponst. (Op de foto's lijkt de lucht net wit, maar in real life valt het gesponste deel ook minder op).

Daarna begin je met de outlines van de vlinder. Dit is een beetje moeilijk uit te leggen zo, maar je begint bij het lichaampje, en vervolgens maak je de vleugeltjes, en de twee voelsprieten. Daarna kun je het vlindertje inkleuren met iedere kleur welke jij maar wilt gebruiken, ik heb hier gekozen voor rood, en het afgewerkt met een paar dunne zwarte lijntjes als versiersel op het vlindertje. Als laatste heb ik een paar zwarte stipjes als 'spoor' van het vlindertje gemaakt.

Natuurlijk kun je dit design ook wat opleuken met eventueel wat stempels van bloemen, of dezelfde vlindertjes in een kleiner formaat, er valt genoeg leuks te doen met dit idee!

This is the design, a cute little butterfly. Handmade, so it's a bit original then the butterflies from the Konad plates. So I started here with the blue background, I used a bit of a light blue. On the tip I sponged heaven with a brighter blue. This is gonna be the background of the nailart.

Up next you start with the outlining of the butterfly, it's hard to explain, but start with the body-> Wings, and end with the antenna of the butterfly. Now you can give the wings a colour, I gave it a red colour with some small black lines. I ended with a track of black dots.

This design is very easy to make, and ofcourse you can play with it. You can stamp or draw some flowers on it. Or you can make another smaller butterfly next to it etc. So just play with it!

P.S. Momenteel ben ik bezig met een stashfilmpje, helaas heb ik geen goed editprogramma om loze stukken uit het filmpje te knippen (met windows live movie maker kun je enkel het begin/eind knippen). Heeft iemand de gouden tip qua bewerkingsprogramma? (Ik werk met windows 7). Wanneer de filmpjes beter gaan worden zal ik van een aantal popsticks een videotutorial maken! Thanks!

P.S. I'm busy with my stashvideo, but I don't have a good program to cut in the video (I made some mistakes, woeps!). Now i'm using windows live movie maker, but with this programm you can't cut your videos. So does anyone have the golden tip for a programm to use? (I work with windows 7). When I got the right programm to edit, i'm going to make some videos with popstick designs, a videotutorial. Thanks!
 

Sunday, November 28, 2010

Tutorial: How to make cupcakes!

Een tijdje terug liet ik al de notd van de cupcakes zien. Vandaag ga ik de fototutorial plaatsen. Nu is het dus je kans om deze cupcakes ook te maken!

A while ago I posted a notd with cupcake nailart. Today i'm going to show you the tutorial how you can make these cupcakes by yourself!

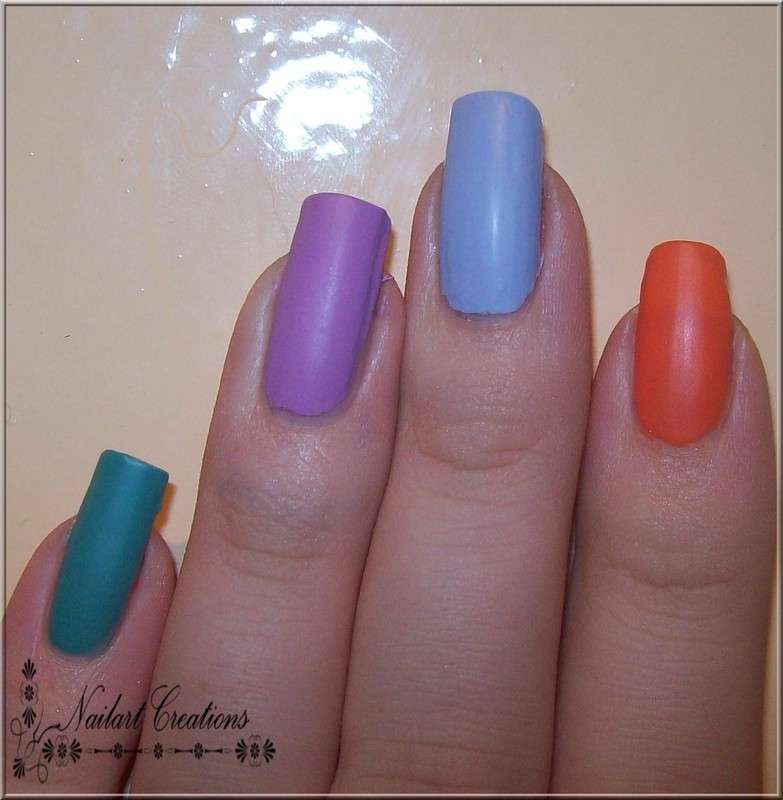
 Natuurlijk begin je eerst met de basiskleuren, ik heb ervoor gekozen om op iedere nagel de cupcake een andere kleur te geven (Hier kun je de kleurtjes vinden welke ik gebruikt heb). Ik heb de kleurtjes daarna ook mat gemaakt, om de cupcakes een aparte look te geven. Je kunt ze uiteraard ook glanzend laten, of allemaal hetzelfde kleurtje!


Ofcourse you start with the basecolours, I choosed for every nail another nailpolish (You can find the polishes I used here). Up next I made the colours matte to give it a special look. Ofcourse you can make them shiny or every cupcake the same colour, it's your choice!


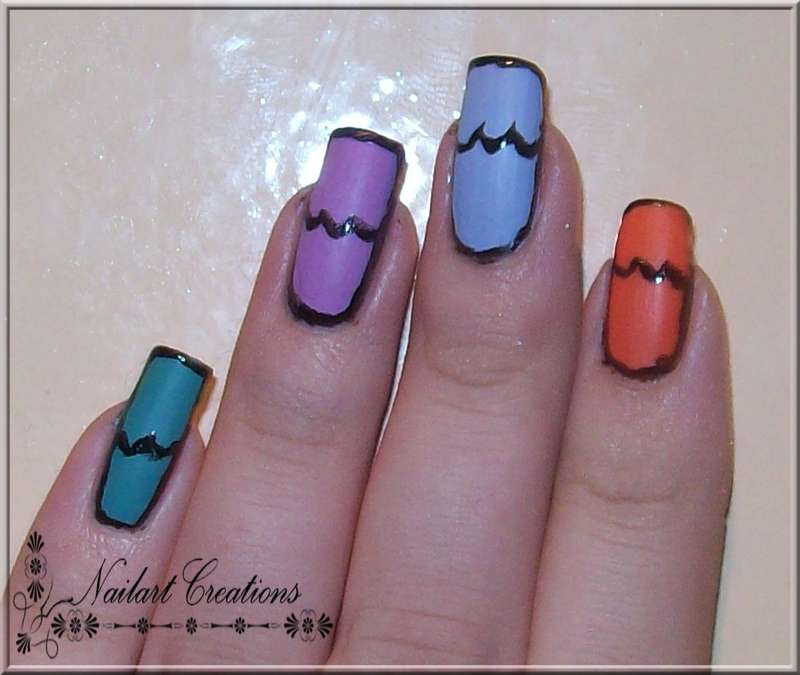
Nu begin je met de uitlijning van de cupcakes. Ik heb een simpele zwarte lak van de hema genomen en een klein kwastje om de uitlijning te maken. Het makkelijkste is om eerst je gehele nagel een zwarte rand te geven (in het geval van vierkante nagels (wat ik dus heb) kun je de randjes op de tips rond afwerken, zo zien de cupcakes er vanboven toch nog rond uit). Na de hele nagel een lijn gegeven te hebben maak je ongeveer in het midden van je nagel een paar hobbelige lijntjes zoals hierboven.


Up next you make the outline of the cupcakes. I used a simple black polish from Hema with a little brush to make the lines. The easiest way is to begin with a black line round your nails. (If you haven't got round nails, make the black line a little bit round (now it looks round too ;)). After the outlining of your whole nail, you'll start with an bumpy line on the middle of your nails (just like I did on above pic).


De volgende stap is de bovenkant van de cupcakes opvullen met witte nagellak. Ik heb hiervoor La Femme beauty - White gebruikt. Het mooiste is om wel een goede dekkende witte nagellak te nemen, dit geeft een mooier resultaat.


The next step is fill in the above half of the cupcakes with a white polish. I used La Femme Beauty - White for this one. It's a good idea to use a good pigmented white polish, this has the best results.


Nu gaan we de bovenkant van de cupcakes versieren met wat 'snoepjes'. Ik heb hiervoor kleine gekleurde beads gebruikt die ik met wat nagellijm vast heb gezet. Je kunt ook verschillende soorten stipjes zetten met bijvoorbeeld een dotting tool of een kwastje. Ook kun je gekleurde kleine rhinestones gebruiken, met dit deel kun je je eigenlijk gewoon uitleven met wat je maar wilt!


Now we're going to decorate the cupcakes with some 'candy'. I used some coloured beads. I put them on my nails with some nailglue. You can make some tiny coloured dots with a dotting tool or brush too. You can pick up some little rhinestones too! This part is for filling in your own choice!


Als laatste zet je op iedere nagel 3 verticale zwarte streepjes. En nu zijn je cupcakes helemaal klaar! Het is dus niet zo'n hele ingewikkelde nailart om te maken! Nu lijkt het me ook erg leuk om jullie creaties te zien! Dus heb jij toevallig ook cupcakes op je nagels gemaakt? Of ga je deze maken met behulp van mijn tutorial? Ik zou het erg leuk vinden als jullie je cupcakenailart zouden mailen naar: nailartcreationsblog@gmail.com. Als er genoeg mailtjes binnen komen wil ik hier een aparte post van maken met jullie foto's! (Dus met jullie namen inclusief jullie bloglinks (meteen ook een beetje reclame voor jullie eigen blogs! ;)).


The last step is the 3 vertical stripes on each nail. And now are the cupcakes ready! So it's not a really difficult nailart to make! Now you would be making me very happy when you also made an cupcakenailart, or when you're going to make one with some help of this tutorial. So sent me your cupcakenailart pictures to: nailartcreationsblog@gmail.com.  When there are enough pictures i'm going to make a post with your pictures! ( Including your name and bloglink ofcourse, so it's at the same time a good moment to promote your blog ;)).

Dus ik hoop dat jullie je leuke creaties naar me toe zenden!/ So I'll hope you guys will mail your gorgeous cupcakenailarts!

Tutorial: How to make cupcakes!

Een tijdje terug liet ik al de notd van de cupcakes zien. Vandaag ga ik de fototutorial plaatsen. Nu is het dus je kans om deze cupcakes ook te maken!

A while ago I posted a notd with cupcake nailart. Today i'm going to show you the tutorial how you can make these cupcakes by yourself!

 Natuurlijk begin je eerst met de basiskleuren, ik heb ervoor gekozen om op iedere nagel de cupcake een andere kleur te geven (Hier kun je de kleurtjes vinden welke ik gebruikt heb). Ik heb de kleurtjes daarna ook mat gemaakt, om de cupcakes een aparte look te geven. Je kunt ze uiteraard ook glanzend laten, of allemaal hetzelfde kleurtje!


Ofcourse you start with the basecolours, I choosed for every nail another nailpolish (You can find the polishes I used here). Up next I made the colours matte to give it a special look. Ofcourse you can make them shiny or every cupcake the same colour, it's your choice!


Nu begin je met de uitlijning van de cupcakes. Ik heb een simpele zwarte lak van de hema genomen en een klein kwastje om de uitlijning te maken. Het makkelijkste is om eerst je gehele nagel een zwarte rand te geven (in het geval van vierkante nagels (wat ik dus heb) kun je de randjes op de tips rond afwerken, zo zien de cupcakes er vanboven toch nog rond uit). Na de hele nagel een lijn gegeven te hebben maak je ongeveer in het midden van je nagel een paar hobbelige lijntjes zoals hierboven.


Up next you make the outline of the cupcakes. I used a simple black polish from Hema with a little brush to make the lines. The easiest way is to begin with a black line round your nails. (If you haven't got round nails, make the black line a little bit round (now it looks round too ;)). After the outlining of your whole nail, you'll start with an bumpy line on the middle of your nails (just like I did on above pic).


De volgende stap is de bovenkant van de cupcakes opvullen met witte nagellak. Ik heb hiervoor La Femme beauty - White gebruikt. Het mooiste is om wel een goede dekkende witte nagellak te nemen, dit geeft een mooier resultaat.


The next step is fill in the above half of the cupcakes with a white polish. I used La Femme Beauty - White for this one. It's a good idea to use a good pigmented white polish, this has the best results.


Nu gaan we de bovenkant van de cupcakes versieren met wat 'snoepjes'. Ik heb hiervoor kleine gekleurde beads gebruikt die ik met wat nagellijm vast heb gezet. Je kunt ook verschillende soorten stipjes zetten met bijvoorbeeld een dotting tool of een kwastje. Ook kun je gekleurde kleine rhinestones gebruiken, met dit deel kun je je eigenlijk gewoon uitleven met wat je maar wilt!


Now we're going to decorate the cupcakes with some 'candy'. I used some coloured beads. I put them on my nails with some nailglue. You can make some tiny coloured dots with a dotting tool or brush too. You can pick up some little rhinestones too! This part is for filling in your own choice!


Als laatste zet je op iedere nagel 3 verticale zwarte streepjes. En nu zijn je cupcakes helemaal klaar! Het is dus niet zo'n hele ingewikkelde nailart om te maken! Nu lijkt het me ook erg leuk om jullie creaties te zien! Dus heb jij toevallig ook cupcakes op je nagels gemaakt? Of ga je deze maken met behulp van mijn tutorial? Ik zou het erg leuk vinden als jullie je cupcakenailart zouden mailen naar: nailartcreationsblog@gmail.com. Als er genoeg mailtjes binnen komen wil ik hier een aparte post van maken met jullie foto's! (Dus met jullie namen inclusief jullie bloglinks (meteen ook een beetje reclame voor jullie eigen blogs! ;)).


The last step is the 3 vertical stripes on each nail. And now are the cupcakes ready! So it's not a really difficult nailart to make! Now you would be making me very happy when you also made an cupcakenailart, or when you're going to make one with some help of this tutorial. So sent me your cupcakenailart pictures to: nailartcreationsblog@gmail.com.  When there are enough pictures i'm going to make a post with your pictures! ( Including your name and bloglink ofcourse, so it's at the same time a good moment to promote your blog ;)).

Dus ik hoop dat jullie je leuke creaties naar me toe zenden!/ So I'll hope you guys will mail your gorgeous cupcakenailarts!

Tutorial: How to make cupcakes!

Een tijdje terug liet ik al de notd van de cupcakes zien. Vandaag ga ik de fototutorial plaatsen. Nu is het dus je kans om deze cupcakes ook te maken!

A while ago I posted a notd with cupcake nailart. Today i'm going to show you the tutorial how you can make these cupcakes by yourself!

 Natuurlijk begin je eerst met de basiskleuren, ik heb ervoor gekozen om op iedere nagel de cupcake een andere kleur te geven (Hier kun je de kleurtjes vinden welke ik gebruikt heb). Ik heb de kleurtjes daarna ook mat gemaakt, om de cupcakes een aparte look te geven. Je kunt ze uiteraard ook glanzend laten, of allemaal hetzelfde kleurtje!


Ofcourse you start with the basecolours, I choosed for every nail another nailpolish (You can find the polishes I used here). Up next I made the colours matte to give it a special look. Ofcourse you can make them shiny or every cupcake the same colour, it's your choice!


Nu begin je met de uitlijning van de cupcakes. Ik heb een simpele zwarte lak van de hema genomen en een klein kwastje om de uitlijning te maken. Het makkelijkste is om eerst je gehele nagel een zwarte rand te geven (in het geval van vierkante nagels (wat ik dus heb) kun je de randjes op de tips rond afwerken, zo zien de cupcakes er vanboven toch nog rond uit). Na de hele nagel een lijn gegeven te hebben maak je ongeveer in het midden van je nagel een paar hobbelige lijntjes zoals hierboven.


Up next you make the outline of the cupcakes. I used a simple black polish from Hema with a little brush to make the lines. The easiest way is to begin with a black line round your nails. (If you haven't got round nails, make the black line a little bit round (now it looks round too ;)). After the outlining of your whole nail, you'll start with an bumpy line on the middle of your nails (just like I did on above pic).


De volgende stap is de bovenkant van de cupcakes opvullen met witte nagellak. Ik heb hiervoor La Femme beauty - White gebruikt. Het mooiste is om wel een goede dekkende witte nagellak te nemen, dit geeft een mooier resultaat.


The next step is fill in the above half of the cupcakes with a white polish. I used La Femme Beauty - White for this one. It's a good idea to use a good pigmented white polish, this has the best results.


Nu gaan we de bovenkant van de cupcakes versieren met wat 'snoepjes'. Ik heb hiervoor kleine gekleurde beads gebruikt die ik met wat nagellijm vast heb gezet. Je kunt ook verschillende soorten stipjes zetten met bijvoorbeeld een dotting tool of een kwastje. Ook kun je gekleurde kleine rhinestones gebruiken, met dit deel kun je je eigenlijk gewoon uitleven met wat je maar wilt!


Now we're going to decorate the cupcakes with some 'candy'. I used some coloured beads. I put them on my nails with some nailglue. You can make some tiny coloured dots with a dotting tool or brush too. You can pick up some little rhinestones too! This part is for filling in your own choice!


Als laatste zet je op iedere nagel 3 verticale zwarte streepjes. En nu zijn je cupcakes helemaal klaar! Het is dus niet zo'n hele ingewikkelde nailart om te maken! Nu lijkt het me ook erg leuk om jullie creaties te zien! Dus heb jij toevallig ook cupcakes op je nagels gemaakt? Of ga je deze maken met behulp van mijn tutorial? Ik zou het erg leuk vinden als jullie je cupcakenailart zouden mailen naar: nailartcreationsblog@gmail.com. Als er genoeg mailtjes binnen komen wil ik hier een aparte post van maken met jullie foto's! (Dus met jullie namen inclusief jullie bloglinks (meteen ook een beetje reclame voor jullie eigen blogs! ;)).


The last step is the 3 vertical stripes on each nail. And now are the cupcakes ready! So it's not a really difficult nailart to make! Now you would be making me very happy when you also made an cupcakenailart, or when you're going to make one with some help of this tutorial. So sent me your cupcakenailart pictures to: nailartcreationsblog@gmail.com.  When there are enough pictures i'm going to make a post with your pictures! ( Including your name and bloglink ofcourse, so it's at the same time a good moment to promote your blog ;)).

Dus ik hoop dat jullie je leuke creaties naar me toe zenden!/ So I'll hope you guys will mail your gorgeous cupcakenailarts!